My power steering pump has leaked since I have owned the GMC. I could never tell where it was coming from and didn’t realize that it was P/S fluid since it looks a lot like motor oil once it washes the dirt off of the frame before it falls to the ground. I did let it run down to where I could hear the pump vanes whining twice in the 5 years of operation but I didn’t let it run that way very long. No matter, the leak got worse and needed to be fixed so I decided to do so while I had it up on my new jack stands and I was waiting for the exhaust parts to arrive.
I was pretty afraid to tackle a job like this since I am pretty new to heavy duty mechanic stuff but, thanks to Steve Ferguson and others helping me learn on other projects, I have become braver lately. I figured that if I could remove and replace my A/C compressor (done during the removal and replacement of my intake manifold under Steve’s supervision) I could handle this. I found some instructions on one of the GMC sites for “Renewing the power steering system” by Egon Elssner and, except for the fact there were no pictures the job didn’t seem too bad – it did refer to the maintenance manual diagrams which did help a lot but the terminology is missing from the diagram so it was hard for me to follow.
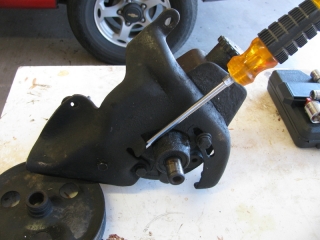
After reviewing the instructions and the diagrams I started and the hardest part of removing the pump was getting the belts out of the way. It is necessary to remove the A/C compressor belt – OK since I want to install Gary Bovee’s belt tensioning device anywhay – and the alternator belt and that actually took some time for some reason. Removing the pump is messy because of the mess from the leak and because removing the hoses causes fluid to drain onto the front running gear – hard to avoid. In the process of removing the pump I did discover how to tighten the belt when necessary – people are always warning you not to push on the tank that surrounds the pump but not how to do that – now I know (see the photo below).
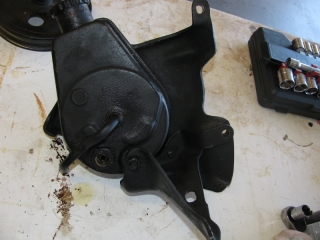
Here are two photos I took of the old pump after it had been removed from the front of the engine and before it is removed from the bracket system that holds it.The second photo shows how to tension the belt with a long and heavy screw driver type lever inserted behind the pulley from the top where you also have access to the adjustment bolt which is also behind the pulley.
| This is the back side of the pump showing how the bracket and the pump are assembled so I know how to reassemble the new one. | |
| This is the front side of the pump with the pully removed (thanks to a loaner pully puller from O’Reilly Auto Parts) showing how to insert a “screw driver like lever” into the front of the pump and tension the belt without pressing on any bad stuff. |
Since I had the hoses out I decided to make sure that they were good by having them rebuilt at “HosePower” in Tucson – I am not happy with their urgency though – it has took 2 days to get one of the hoses back because of out of stock fittings. The lower hose from the steering box to the windshield wiper motor had been rubbing on the body and was worn through to the steel reinforcement. I didn’t know how old either one of them were so better safe than sorry. The rebuilt hoses use material that is good for over 2500 pounds of pressure and they look great. I cleaned the filter to the windshield wiper motor and added a new filter on the low pressure return line to the pump as advised by Egon Elssner’s instructions.
I ordered a rebuilt pump from Merle’s Automotive Supply in Tucson and they supplied the same pump as Applied GMC sells (same re-builder that is) and said they have been using them for a couple of years with no problems – here’s hoping.
The re-installation of the pump was really easy – mostly because it was clean and because I knew where all the bolts went. I had to wait for the second hose though so the elapsed time was pretty long. Took a total of an hour or two to put it all back together – can’t really test until the exhaust system is done later.


No Comments Yet