On to Nevada

On to Nevada
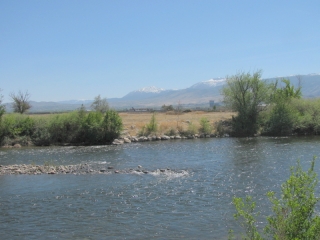
View of mountains and Truckee River fromĀ  the ‘Rivers Edge’ campground in Reno, Nevada

We are now heading to Las Vegas to see “Jersey Boys” at the Paris Casino.

Our first order of business was to get over the Sierra Nevada Mountains. We took I-80 East from Sacramento and went over the infamous Donner Pass to Reno. It is hard to imagine those Conestoga wagons crossing these mountains way back then – not hard to see why they had so much trouble.

The GMC did pretty well but the climb was about 7000 feet overall and most of that was over a 40-mile stretch – pretty tough. Everything ran well – I think the driver’s side exhaust manifold needs to be replaced but it can wait until we get home. The engine periodically had some strange kind of performance issue – seemed like a misfire or something – but it was only during the heaviest climbs, at high altitude (5000+ feet), and it stopped if I let my foot off the gas and then resumed. We’ll see what that turns into as we proceed.

We took 3 1/2 hours to get to Reno and probably used a lot of gas but we won’t find out until we fill up tomorrow morning. We are camped at the “Rivers Edge RV Park” on the Truckee River in Reno, Nevada. It is a pretty nice place even if it is in the approach path of the Reno Airport. The jets come in pretty low but not very often. We are hoping that they quit early tonight.

We took a walk along the river and rested after two pretty intense weeks of work and visits. Carol got some tickets for “Jersey Boys” for Thursday evening and we should get there on Wednesday. Tomorrow we expect to drive down highway 95 to Tonopah, Nevada, spend the night at a casino or whatever and then arrive at Las Vegas on Wednesday.

Birthday parties and dogs

Birthday parties and dogs

Sunday was birthday party day – the day before Katelyn’s 9th birthday and only 4 days before Alex’s. We had 3 sets of grandparents, uncles, cousins and friends all bringing gifts and both local grandmothers brought cupcakes – pretty and delicious – some with a butterfly theme, some with a Lego theme, and some with a chocolate theme – see the photos below.

Katelyn had a choice for her birthday gift from here parents – either a Kindle Fire or she could get her own puppy to raise and prepare to be a guide dog for the blind. We can proudly say she chose the dog and the gift was symbolized by a new dog bed (the guide dog to be will come in a week or two). That choice was put to the test when brother Alex did get a Kindle Fire but Katelyn has saved enough to buy one for herself and, with Dad’s help, did that after the party.

Turns out that Kindle Fires are Android-based tablets and can be used to read books, surf the net, and play games. Mark and Kristin have their work cut out for them regarding rules for the Kindles.

I have to tell those who don’t already know, Mark and Kristin and proud owners of “The Local Bark”, a Sacramento-area (Rancho Cordova) dog boarding and training business. They recently started a new program training “Diabetic Alert” dogs. These are service dogs, like guidedogs for the blind, that accompany their owners everywhere and can detect and alert their owners’ to the need for insulin. Visit their site at www.localbark.com to read about it and all of the other services they provide. Can you tell I am a proud Dad?

Catching up

Catching up

After San Lorenzo County Park in King City on Sunday night we stopped in Salinas to visit our former business on Monday morning to see how things were running – just passed 20 years in business and still there. Pretty good for a discretionary spending type of business (custom picture framing) in this economy.

We got to Casa de Fruta on Monday afternoon and started working on whatever needed doing to be ready for day 1 of the GMC Western States rally on Tuesday afternoon. Most of the information about what we kept busy doing all week is on the gmcws.org web site under ‘rally reports’ but I’ll try to give you some idea of what we did personally during the week.

The weather was really nice on Monday and was supposed to be nice for a couple of days before turning rainy later in the week. This is pretty late for rain in this area (we lived just 40 miles or so down the road for about 16 years before moving to Arizona) but it was not expected to be cold do it would be a nice change for us. We ate at the ‘Casa de Restaurant’, right next to the ‘Casa de Deli’ and ‘Casa de Wine’ since we were on our own due to our one-day early arrival. The food was good – especially the fruit pies – and we can safely recommend it if you are passing by.

I was busy from morning until evening every day. Since I am currently president of the club I feel that I have to stick my nose in everywhere to make sure that things are going well and that people feel appreciated. The club and the rallies are run entirely by volunteers and, with almost 90 coaches expected, there was plenty to stick my nose into.

The most noticeable personal thing about the week is that one of the sessions was called ‘Driving Miss Daisy’ and was about introducing women to driving the GMC. Carol signed up for it and, by Friday, drove our coach around the campground and even brought it to the vehicle weighing station – this required a tight turn, including backing the coach – while I was working there. This was her first time driving in the 5 years we have had the coach. She said it was fun.

On a technical note, when we were getting ready to leave after the rally on Sunday morning I noticed that the engine was suddenly much noisier than it was on our way here. Both exhaust manifolds were leaking and, by the time we arrived at our son’s house in San Jose on Sunday afternoon it was pretty loud.

We stayed in San Jose for 4 nights and during that time I bought a new set of Remflex exhaust manifold gaskets and installed one on the loudest (passenger) side. On the driver’s side I only tightened the bolts which were much looser than they were supposed to be. The bolts had been torqued to the specified value when they were installed. They were held in place by a piece of sheet metal that prevented them from turning and it had worked for at least 10K miles on the driver’s side until now.

I don’t know for sure yet, but I think that removing the old mufflers and installing new ones just before this trip somehow disturbed the gaskets – probably compressed them somewhat from the cutting and pulling. They may or may not still be leaking a little but I could not tell for sure during the 4-hour trip to the Sacramento area later in the week to visit our other son. We’ll be able to tell for sure when we leave here on Monday morning and head for Nevada over I-80.

Gas mileage, by the way, has been pretty bad. It is improving with every fill-up so I decided to check it by eliminating that first hot day. With that first day eliminated the mileage has improved by about 10 percent from previous trips – I would have to say that the improved exhaust system is the reason. The temperatures are supposed to be higher next week so we’ll see what happens.

The visits have been a lot of fun. It is always great to see both families and the 5 grandchildren. Check below for lots of photos.

Out of the desert and on to the coast

Out of the desert and on to the coast

We left the casino parking lot at about 8am and filled up with gas at $4.39 per gallon, our highest yet. We took on 28 gallons of gas which brought our average mileage for yesterday to a whopping 5.7 mpg. This was awful. We have now done everything we can to improve mileage – the latest being replacing our cheap clogged up mufflers and pipes – and our mileage went down!

Today was a lot cooler. It was 82 degrees when we left the parking lot and it got to maybe 85 or so going down I-10 but it pretty quickly started dropping. The closer we got to the coast the cooler it got. The lowest we saw was 60 driving up along the ocean around Pismo Beach.

Of course “she” ran much better today and I couldn’t see the gas gauge moving like I could yesterday. Our only fill-up today was for 32 gallons at about $4.29 but the mileage was up to 7.6. I am not counting my chickens yet because the mileage for each tank can vary a lot because of tank venting issues (at least one pinched vent line) but the gas gauge was almost visibly moving yesterday – really.

I have a theory that now that we have fixed the exhaust system the next item to address is the air intake. The cooler air today made a huge difference in performance – no surprise to some – and I am thinking that hot fuel (actually boiling) combined with hot intake air was a bad combination yesterday. I will have to think about this.

We pulled into King City, Calif. at about 4:30 without a single hiccup today. We checked into San Lorenzo County Park – a favorite since being introduced to it by our GMCWS rally last Spring. The nicest spot we could find was close to a 1967 Dodge Travco motorhome that reminds people of a GMC. They are a very small group compared to the GMC. See it in the photos below.

The Travco is owned by a young couple Gary and Liz with a one-year old daughter Julie from Ventura, Calif. He is a mechanical engineer with a job but his hobby is being a mechanic.

The engine in the Travco is one that has not been made since the late 70s and was designed for farm equipment and trucks. Gary rebuilt the engine and has driven it many times over short distances. This trip was two days into a planned two week trip but, just as they got to King City his engine started making lots of noise so he limped into this county park. That was yesterday. He got a lot done since then but the local tow operator wants $1800 to tow him to Ventura. We have called our friend, former employee, and new owner of Artistic HangUps, Carla to see if she can find anyone with a tow truck in Salinas which is only 40 miles away. We are hoping we can help them. We’ll let you know tomorrow.

Crossing the desert on the hottest day of the year

Crossing the desert on the hottest day of the year

When we left this morning at 10am it was already 92 in front of our house. By about 11 in the Casa Grande area it was 96. It quickly got to 100 and by afternoon it was about 106. It peaked in downtown Brawley, CA at 110. This is the third week of April, Saguaro cacti are blooming – not all of them yet but many of them. When we first moved here that didn’t happen until late May. This is a very early summer.

Well, despite my best efforts (the latest was blocking the intake manifold cross-overs), vapor problems continue to persist. Everything was going well until we got to the cutoff to Gila Bend where we stopped for gas. I had to spend a few minutes bleeding the pressure out from the fuel tanks before I could remove the cap but thought nothing of it.

By now it was over 100 degrees out. We pulled back onto I-8 and I mentioned to Carol how well “she” was running and “she” immediately stumbled with the same old symptoms. I pumped the accelerator and kept it going but was disappointed that the problem was still with us.

When we got to Yuma we stopped for gas again before we crossed into Calif.Ā  When I shut the engine off I could hear a pretty loud humming sound which turned out to be the gas cap relieving pressure – that is a lot of pressure. It again took several minutes of slowly bleeding the pressure by slightly opening and closing the gas cap.

This time I decided to just leave the gas cap loose and we left. We didn’t get very far – the problem became more serious – we even stalled going down the road on the highway. I stopped and tightened the cap and we were back to “stumbles” once in a while but nothing serious.

I am thinking that the pressure that builds up in the tank helps to keep the gas from boiling. When it is boiling the pump can pick up bubbles and starve the engine. I had a link here when I first wrote this post but it no longer works.

Oh well, we got to Indio and the Spotlight 29 Casino at about 5:30 – pooped. We had to run the generator and both air conditioners for quite a while to get it cool and now, at 9pm it is still 96 out. We can’t have the generator on all night so I hope there is a good breeze tonight. Tomorrow we will get close to the coast so no more heat problems – we hope.

Getting ready for the Spring 2012 GMCWS Rally Trip

Getting ready for the Spring 2012 GMCWS Rally Trip

At least once per year we go back to California for family visits, business and GMC rallies. This year we plan to leave on Saturday, April 21st. We used the coach several times this winter going to GMC Saguaro Jetset rallies and one trip to get some help working on the coach – more on that below.

Every time we use the coach we add or at least update our “to do” list – things that would make life on the road so much better if they were done. This year was no exception except that it seems like the list is getting shorter. After our return from last summer’s trip I had a list of “to-dos” a mile long.

One of the most irritating things about the trip last summer was that the hot water tank was leaking. It leaked enough that it caused the pump to run every few minutes but not enough to get anything inside the coach wet. We had to turn the water pump off when we were not using it and it could only be turned on with a switch next to the coach entrance door. I needed to do two things to make life bearable for our upcoming winter trips – replace the water heater and put a two-way switch for the water pump in the bathroom. Got both done along with a modification to the hot water system that makes it safer and easier to use (you can read about that here). We couldn’t be happier with the results of these changes.

The next thing we had to do was to try and solve the fuel starvation problems that will not go away. The next “recommended” thing to do was to remove the intake manifold, check it for heat cracks, clean it up, and reinstall it with the “exhaust cross-over passage” blocked. This is, relatively speaking, a big job – complicated, difficult, and time-consuming. Luckily, a good friend from the GMC community – Steve Ferguson – who had done jobs like this many times, offered to guide me through it if I did it at his house. With quite a bit of work and lots of direction from Steve we got it done and I learned a lot.

As soon as we got the engine started again after the intake manifold job it became apparent that the change had an effect on the exhaust system. The first thing we heard was a leak in an exhaust manifold which we fixed that pretty quickly since I had a new Remflex gasket ready to install. The other thing we heard was a leaky muffler that suddenly became much louder than when I arrived.

A problem that had existed since we owned the coach was the power steering pump was leaking. Having the experience from working with Steve on the intake manifold I figured that I could now take on a little bigger job than before so I decided to replace the power steering pump and the high pressure hoses. I did it and it no longer leaks – it was pretty easy too.

Now it was time to fix that exhaust system – the next thing on my list. Besides noise, the exhaust system could have been causing some of the excessive cross-over heat and some of the really bad mileage that we get (less than 7mpg). I was going to install an Applied GMC exhaust kit but decided that the job was too big for me so, instead, I hired an exhaust system shop – Exhaust Works 3 in Tucson – to do it for me. They installed two new Magnaflow stainless steel mufflers and fabricated some new 2 1/2 inch piping to connect them to the existing 2 1/2 inch exhaust pipe. The difference in power and performance seems very noticeable – we’ll be watching mileage closely on this trip.

We will begin packing on Thursday or Friday and leave Saturday morning. See you then.

We have ventilation!

We have ventilation!

The GMC is not known for good ventilation. Driving down the road when the sun is out and the windows are closed is not a good idea – all that glass makes the coach tend be be a little warm up front. The ventilation setting on the dash heater and air conditioning system does nothing – I don’t know if that was improved in later models or not but the 1976 is not too good.

A couple of years ago I made (copied the design I had seen on other coaches) some air deflectors that mounted just in front of the “toll” windows. They scoop the air that goes between the mirror and the side of the windshield and deflect it into the window along with the occasional wasp or bee. Not only does it sometimes get exciting, it is very noisy – putting a screen over the window to reduce the bug flow makes it even noisier.

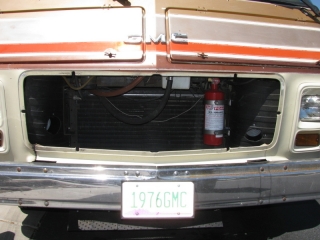
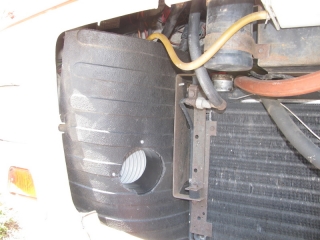
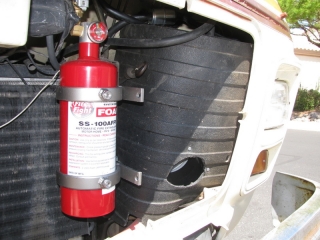
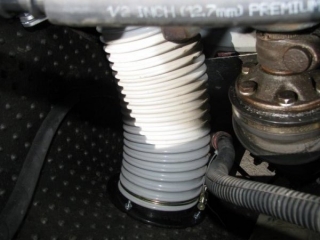
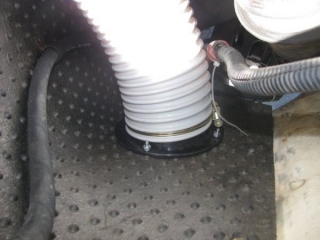
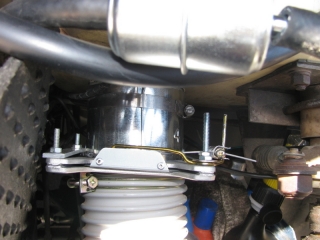
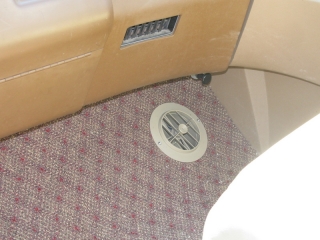
I decided to do what others had done before me and put some air ducts through the firewall and draw ventilation air through the grill. I copied a design by Kelvin Dietz (http://www.gmcmhphotos.com/photos/showgallery.php?cat=3409) for modifying some 4-inch aluminum dust collection blast gates so I could control them remotely. I used some standard 4 inch vent covers to cover the holes in the floor (firewall), connected them to the modified blast gates with some 4 inch sheet metal duct material, and ran some 4″ all plastic (didn’t want to use any metal near the battery connections on the passenger side) air conditioning ducting hose to the grill area. I connected the 4 inch plastic tubing to my home made (from truck mud flaps) radiator air deflectors with dust collection fittings.

Here are some photos of the finished job:

I took the grill out so that I could get to the air deflectors to fasten the dust fittings and cut the openings. If you look closely you can see the two 4-inch openings – one on either side. The one on the left side of the photo is a little higher than the one of the right. In the openings you can see the black dust fitting and the gray plastic hose.
Ā Closeup of the passenger side opening. Only two screws needed – sealing around the fitting not essential, just holding it.
Ā The driver’s side opening is a little lower than the other side. Again, black fitting and gray hose.
Ā This is looking down on the driver’s side air deflector from above and to the right of it. The gray hose comes from the foot pedal area and goes down next to the steering shaft.
Ā Again, looking down on the driver’s side air deflector you can see the dust fitting attached to the air deflector and the gray hose clamped to it.
Ā This shows the modified blast gate attached to the plastic air vent at the top with metal ducting and below to the gray hose.
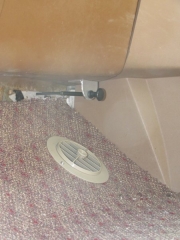
Ā This shows the nice clean installation on the passenger side – the control cable is just above the vent
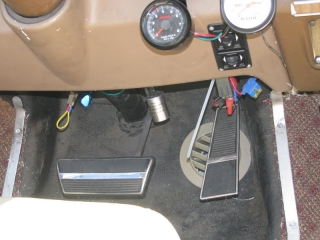
Ā This is the not-quite-so-clean vent installation under the gas pedal – yes, it did get in the way. I was so worried about interfering with the shift lever on the other side of the fire wall that I forgot to think about the gas pedal travel. I bent the lever a little and it seems to be OK.
Ā Another view of the passenger side – easier to see the control cable and the piece of aluminum angle I used for a bracket.

Power steering pump – removal and replacement

Power steering pump – removal and replacement

My power steering pump has leaked since I have owned the GMC. I could never tell where it was coming from and didn’t realize that it was P/S fluid since it looks a lot like motor oil once it washes the dirt off of the frame before it falls to the ground. I did let it run down to where I could hear the pump vanes whining twice in the 5 years of operation but I didn’t let it run that way very long. No matter, the leak got worse and needed to be fixed so I decided to do so while I had it up on my new jack stands and I was waiting for the exhaust parts to arrive.

I was pretty afraid to tackle a job like this since I am pretty new to heavy duty mechanic stuff but, thanks to Steve Ferguson and others helping me learn on other projects, I have become braver lately. I figured that if I could remove and replace my A/C compressor (done during the removal and replacement of my intake manifold under Steve’s supervision) I could handle this. I found some instructions on one of the GMC sites for “Renewing the power steering system” by Egon Elssner and, except for the fact there were no pictures the job didn’t seem too bad – it did refer to the maintenance manual diagrams which did help a lot but the terminology is missing from the diagram so it was hard for me to follow.

After reviewing the instructions and the diagrams I started and the hardest part of removing the pump was getting the belts out of the way. It is necessary to remove the A/C compressor belt – OK since I want to install Gary Bovee’s belt tensioning device anywhay – and the alternator belt and that actually took some time for some reason. Removing the pump is messy because of the mess from the leak and because removing the hoses causes fluid to drain onto the front running gear – hard to avoid. In the process of removing the pump I did discover how to tighten the belt when necessary – people are always warning you not to push on the tank that surrounds the pump but not how to do that – now I know (see the photo below).

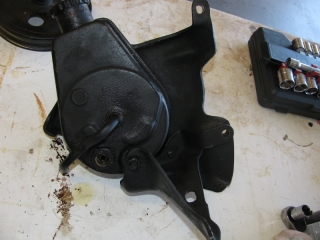
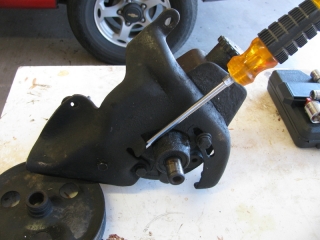
Here are two photos I took of the old pump after it had been removed from the front of the engine and before it is removed from the bracket system that holds it.The second photo shows how to tension the belt with a long and heavy screw driver type lever inserted behind the pulley from the top where you also have access to the adjustment bolt which is also behind the pulley.

This is the back side of the pump showing how the bracket and the pump are assembled so I know how to reassemble the new one.
This is the front side of the pump with the pully removed (thanks to a loaner pully puller from O’Reilly Auto Parts) showing how to insert a “screw driver like lever” into the front of the pump and tension the belt without pressing on any bad stuff.

Since I had the hoses out I decided to make sure that they were good by having them rebuilt at “HosePower” in Tucson – I am not happy with their urgency though – it has took 2 days to get one of the hoses back because of out of stock fittings. The lower hose from the steering box to the windshield wiper motor had been rubbing on the body and was worn through to the steel reinforcement. I didn’t know how old either one of them were so better safe than sorry. The rebuilt hoses use material that is good for over 2500 pounds of pressure and they look great. I cleaned the filter to the windshield wiper motor and added a new filter on the low pressure return line to the pump as advised by Egon Elssner’s instructions.

I ordered a rebuilt pump from Merle’s Automotive Supply in Tucson and they supplied the same pump as Applied GMC sells (same re-builder that is) and said they have been using them for a couple of years with no problems – here’s hoping.

The re-installation of the pump was really easy – mostly because it was clean and because I knew where all the bolts went. I had to wait for the second hose though so the elapsed time was pretty long. Took a total of an hour or two to put it all back together – can’t really test until the exhaust system is done later.

Drawer latches that keep them closed during travel, are easy to open and look great!

Drawer latches that keep them closed during travel, are easy to open and look great!

Drawers flying open when you take turns is a problem in RVs and boats. I bought some latches on eBay (still available: seach for Whisperlatch – they were $3 each when I first bought them – search for sea-dog 224300-1 on google) that are meant to solve the problem but putting them into drawers where they will look good – the middle comes to mind – makes them unable to reach anything that holds the drawer closed. Some extensions of some kind are in order.

I solved the problem by making extensions from wood and aluminum bar stock. These extensions are made by gluing two pieces of wood together, one with a groove/channel that accepts the piece of aluminum bar stock without restriction (1/8 inch x 3/4 inch) and the other thick enough to space the channel out the proper distance from the drawer front (about 5/16 I think) to match up the channel with the latch. Once they are glued together you cut them and the bar stock to the length you need them to be – the piece of wood must be at least 1/8 inch above the top of the latch to give it room to work. The piece of aluminum bar stock is held in place by gravity – no springs needed – and is long enough to go behind the face frame of the cabinet when extended.

Using my 6+-Ton wooden jack stands for the first time

Using my 6+-Ton wooden jack stands for the first time

I am getting ready to replace my exhaust system so I need to have access to the entire length of the coach at the same time. I cannot work on my coach at my house but, luckily, the owner of the storage lot where I keep it allows me to work on it there. That is the good news, the bad news is that the lot is crushed granite on top of Arizona caliche (hardpad) and not to be trusted to hold up all four corners of a GMC with me under it.

In preparation for this job I built some wooden jack stands that another gmcer, Steve Southworth, designed and advocates. Steve narrowly avoided serious injury when a metal jack stand slipped out from under a car he was under. Since then Steve has advocated the use of these wooden stands. Steve’s gmc photo site album is at http://www.gmcmhphotos.com/photos/showgallery.php?cat=5461 has lots more photos and information. Steve sent me a spreadsheet that makes the cutting and construction of the jack stands a quick affair – I did mine in less than 3 hours from start to finish. Here is a link to my copy of Steve’s spreadsheet, hopefully, Steve doesn’t mind me sharing his work.

I crawled underneath the coach using my new jack stands for the first time today and I felt very safe – and I like the height. The stands come out to be 17 1/2 inches tall if you do them the way Steve does and that is a pretty good boost for a 12,000 pound vehicle. I borrowed my neighbor’s 2 1/4 ton floor jack and used that to jack up the front first. That was a mistake. Jacking up the front first makes the back too low to get much under it and my neighbor’s jack could not handle the weight of the back so it took me two bottle jacks – a short one and a taller one – to work the back up high enough to get under the bogies and I had to remove the top layer (the unglued one) at that. Next time I will do the front after the back is up – I think.

Here are some photos of the coach up on the jack stands for the first time: