
Installing a permanent bed in the GMC

Installing a permanent bed in the GMC

We never used the rear dinette area.  It seemed like it would be nice to be able to sit there and have dinner looking out the picture-window sized back window but we never did.  The need to make and remake the bed would make using the rear dinette – even if we had a table – too much work.  The other factor was the seam between the seats when the dinette was made up as the bed made the bed less than comfortable for me.

This project got started (in the Spring of 2010) because our house water pump was too loud.  I like to get up early and Carol likes to sleep in a little.  The house water pump is right under Carol’s pillow and it runs when you use water.  It is pretty hard to get up and not use water so I wanted to replace the water pump with one that would not be as loud as the one we had.  I found one that, if I recall correctly, was recommended as efficient and quiet by another GMCer.  It is a Whisper King and it is quiet.  The photos show how I installed it with double sound insulation by using the mounts from the old water pump and the new one.

The platform for the bed was constructed so that I could easily access the water pump when I need to and, hopefully I won’t need to, with a few screws I can access the water tank.  The original design had a blanket chest on the passenger side that was so badly deteriorated from water damage that we didn’t use it.  In order to gain some length for the bed I replaced it with a solid headboard and a slightly wider shelf for stuff like alarm clocks, etc.  The driver’s side is where the water fill door is located so the foot-board had to allow enough depth to cover that.  The new overall length of the bed is 82 inches which is slightly over queen-bed length.  The width is still standard double width but very comfortable for us.

The next part of the problem was a mattress.  We settled on a 5 inch thick queen-sized mattress pad from JCPenny and have a waffle-foam mattress pad over that.  The mattress pad was cut down to standard width using an electric knife – very easy.  The resulting makeshift mattress is very comfortable – we used it for almost 8 weeks on our trip last summer.

The final part of the project is just being completed – a large drawer under the bed for storing less frequently used items.

  The photo on the left is the Whisper King water pump installed on a double insulated mounting constructed from the old and new mounting brackets.  The green thing in the background is a filter that I had not yet removed.


  In the photo on the right I constructed a framework that provides support for several separate pieces of plywood that makes up the bed platform.  Panels were sized to allow access where it might be needed.


  Photo on left shows the foot-board installed and covering the water inlet.  The wood is natural maple – the wood we chose for the rest of the coach.


  On the right the headboard has to have a shelf that can serve as a nightstand but not interfere with sleeping space.


  On the left is the completed bed with the matching valance around the gigantic rear window – it is six feet wide and three feet tall.


Disc brakes and reaction arm system

Disc brakes and reaction arm system

I know this will be upsetting to some GMC enthusiasts but the GMC motorhome has some design flaws – specifically in the braking.  They did put disc brakes on the front wheels but left drums in the back – drum brakes are not very efficient or safe compared to discs.  It can be really exciting if you need to stop an original design GMC quickly.  One time we were climbing and descending steep mountain passes – several in one day – and after we had finished the descent from over 8000 feet on a series of tight switch-backs the brakes failed completely from the heat generated by the drum brakes.

Another issue with the design is that the middle wheels are suspended on forward facing arms that tend to lift the frame during hard braking – hard for some to understand but true.  The problem is solved using a system called the “reaction-arm” invented by Chuck Aulgur and designed by Rick Flanagan for Jim Kanomata at Applied GMC in Fremont, CA.  I had test driven a coach (Rick Flanagan’s) equipped with the reaction-arm system at the GMCWS rally in Auburn, CA last year (2010).  The difference between his coach’s stopping ability and mine was dramatic.  His coach stopped like a new car.

The reaction arm system must be installed over disc brakes.  The combined kits – 4 disc brakes and the reaction-arm – are very expensive but I hate worrying about my brakes, especially going down long hills with only a 3-speed automatic to help slow me down.

I bought both kits from Applied GMC and began installing them on Wednesday, July 20th.  I had planned to install them myself – how hard could it be? – but was pretty apprehensive.  Applied GMC estimated it would take them “about 2 days” if they did it but I didn’t or couldn’t spend that kind of money on top of the parts.  Paul Cloutier told me that he did it in 3 days with help from a friend only on the first day.  When I showed up at our storage space with the parts a young mechanic named George expressed enthusiastic interest in helping me do the installation.  We worked out a very fair hourly rate for him – I couldn’t afford to not hire him – so he has helped me every day.  “Helping me” is actually: he does it with my help and supervision.  George is a very smart, hard-working guy who knows what he is doing – I got lucky.

On the first day my hope was to get the parts sorted and the coach up on jack stands so I could start work on Thursday.  With George’s help we not only got it up on stands but got the drum brakes removed and the coach ready for installation of the new hardware – all in 4 hours.  The second day we got the torque boxes (part of the reaction-arm system) installed and the emergency brakes removed – another 4 hours.  On the third day, Friday, we got the sway bars (more reaction-arm stuff), the hubs and discs, and the calipers installed – 5 hours.

Monday we got master cylinder and the proportioning valve installed.  The new master cylinder is big compared to the OEM but it fits perfectly and the push rod is already the correct length.  The proportioning valve is another perfect match for the original.  Lots of penetrating oil needed along with some encouragement from George.  George also did a great job plumbing the line lock.  Of course, I did a great job making a mounting bracket with suggestions from George.  George is a good mechanic and he says his real skill is in electronics. .

The test drive was less than satisfactory.  It had to be air in the lines because everything seemed to be perfect.  After 6 hours both of us were tired and hot so we decided to come back on Tuesday for a second bleeding and some unrelated maintenance (greasing the front bearings via the zerk fittings JimK installed for me last year).  On Monday night I happened to tell JimK about the bleeding issue – it shouldn’t still have air in it – and he told me about the instructions that I forgot about: a special procedure for the calipers.

On Tuesday a.m. George and I followed the procedure and got air out of 3 of the 4 calipers.  Brakes work much better now.  I ordered some new woven SS hoses for the front and some EBC pads.  When they come in we will finish the installation.  For now I am saying it is ‘done’ and I will move on to making a new dinette table to go with the Honda seats I installed last summer.


On Friday, July 29th, I finally got the job done.  Put new SS braided hoses and EBC pads on the front.  Stops great but the line lock doesn’t work and I don’t know why.  Maybe the back brakes still need to be bled or maybe the line lock itself is bad.  I will find out later – done for now.

Hinged T-skirts

Hinged T-skirts

After I was done installing the quad-bag rear suspension it was time to reinstall the T-skirts – always a real pain in the ‘neck’. I had read about someone else who had the idea to hinge the T-skirts at the top and make some kind of an easy-to-release connection at the bottom. I bought a length of stainless steel piano hinge and used some 1/8″ aluminum bar as backing for the fiberglass. I didn’t use every hole in the hinge – not necessary – and I threaded the aluminum bar to accept the screws. It was a little tough to get installed but it always was hard to install the T-skirts anyway. The original steel/rubber straps at the bottom had to be modified to fit through the quad-bag bracket and it wasn’t quite long enough so I just attached some large washers to the end with tie-wraps and used the original bolts. Now I can just remove the bolts and the skirt hinges up out of the way and can be held in place with a bungee cord attached to the rain gutter.

  The photo on the left shows the finished product.  The hinge does show but is hardly noticeable.

  On the right is the hinge with the T-skirt in the open or up position.  You can see that not every hole was used – very few actually.

  Back on the left you can see the inside of the T-skirt with the aluminum backing plate and threaded holes.

  Using a bungee cord connected to the rain gutter is a handy way to keep the T-skirt out of the way while you work.  This will be handy for the disc brake and reaction arm upgrade which I will be doing soon (July 2011).

  The last photo shows how I modified the original steel and rubber strap at the bottom of the skirt so that it would fit inside the quad-bag frame.  It almost reaches the original bolt but the addition of a large washer and a tie-wrap make it just right.

How to jumper the Park-Neutral Safety Switch

How to jumper the Park-Neutral Safety Switch

I have been fighting with my starter since I have owned the GMC.  At first, it would occasionally go slow when it was hot but would always start.  On our big trip last Summer we got stuck for a couple of hours while I jacked the coach up and re-tightened the electrical end of the solenoid because it had come loose and wouldn’t start.  Some time later, when the starter was hot it would just not start at all – just turn the key and the dash lights would go out and there would be no noise whatsoever.  This kept happening and on one trip I jacked the coach up at a gas pump and swapped the solenoid but still no joy.  About an hour and a half after the problem began, it suddenly went away.  This failure happened on several occasions and went away on its own each time.

In April 2011 we went to the GMCWS rally in King City, CA where one of the most knowledgeable GMCers (known in GMC circles as Mr. ERF) promised to help me solve the problem.  Under his guidance I connected the battery cable directly to the starter – the rest of the electrical system was still routed through the battery shut-off switch and multiple connections – and replaced the ground cable to the engine because the battery connector was suspect.  I also jumpered out the Park-Neutral Safety Switch (PNSS).  I considered replacing the starter at this time but decided that I would rather know what the problem was – I don’t like throwing parts at a problem (my computer diagnostic background) but would rather solve it.  The starter turned noticeably faster than it had but failed again on the way to Sacramento.

We left Sacramento after several days and headed to San Jose for another visit.  We couldn’t pass through Fremont without stopping at Applied GMC for a visit – also had to deliver my recently replaced Rostra cruise control (thanks JimK).  The starter failed again in the Applied GMC parking lot – perfect, now it would get fixed one way or another.  I figured it would now have to be the starter and proceeded to buy a rebuilt from JimK at Applied and installed it myself – but, it did not fix the problem!  I asked JimK for help and Alonso (we love Alonso) started to work on it.  Using a schematic (what a concept!) he traced the problem to an open in the wire to the starter solenoid and found that I had my PNSS jumper on the wrong connectors – the starter problem is now gone.  The newly rebuilt starter combined with the rewiring I did at the King City rally now sounds like a new car.

It turns out that the information on the GMC forum is mostly text and the photos that did exist were poor and didn’t help me.  I had read that the switch was at or near the bottom of the steering column and easy to get to.  Well, it turns out that the switch is just part of a larger multi-purpose switch that also contains the back-up light switch and another associated with the air suspension compressor.  Without a lot of effort – you have to be “part snake” to get down there to work on it – it looks like the air suspension switch is the only one there because the rest of the switch is hidden behind the steering column.  I decided to take some photos to post on the GMC photo site so that others might not make the same mistake as I did.  Here they are:

The Passenger side of the switch


This is the part of the switch that I could see without a lot of effort.  This is the wrong connector and has nothing to do with the starter.


The driver's side of the switch


This is the switch from the driver’s side where you can see the backup light switch connector and almost see the unconnected Park-Neutral Safety Switch lugs.


The driver's side of the switch - different view


This is a slightly different view of the switch with a clearer view of the PNSS connecting lugs – hard to see unless you are part snake.


The wire to the starter solenoid with a jumper.


The correct wires to the starter are purple and normally connected to the driver’s side of the switch.  A well-made jumper on the correct connector solved my problem.  Thanks Alonso.

GMC engine cooling issues

GMC engine cooling issues

Purpose of this post: to resolve some GMC engine cooling issues

The Engine Cooling Issues I am addressing

●        At high ambient air temperatures the fan clutch engages at highway speeds (50+ MPH) and causes lots of noise and negatively affects fuel mileage.

●        The fan clutch wears out faster than it should.  The failure seems to be the fan clutch gets “stuck on” and problem manifests itself in “engine” noise and reduced gas mileage.  The alternative failure would be where the fan clutch gets “stuck off” resulting in loss of cooling in traffic and idle conditions when it is actually needed.

●        The OEM radiator is thought to be inadequate to cool the engine and the inadequacy can be overcome with a new state-of-the-art aluminum radiator.

My Theory

Lots of theories about what is different about the GMC and why cooling and fan clutches are such an issue – my theory is that air flow around the radiator rather than through it is the cause of all of the fan clutch and overheating problems.   It causes fan clutches to fail prematurely and it causes a very large OEM radiator to be inadequate in capacity.

I think that what is happening is that the air entering the front of the vehicle is flowing around the radiator and to the firewall where it swirls back toward the front of the vehicle.  Along the way back to the front it passes over the very hot exhaust. manifold or header and carries that heat to the front of the engine where the fan clutch can sense it and engages until it senses the air has cooled.  This happens at highway speeds.

The reason the radiator is inadequate is because the bulk of the air entering the front of the vehicle is seeking the path of least resistance and going around it.  Very little cool air is getting through the radiator.

The reason the fan clutches are failing is because they are not designed for constant high-RPM use at high temperatures.  Fan clutches are designed to be used when the vehicle is idling or being driven at low speeds in traffic – not highway speeds.  The reason some fan clutches cycle on and off and others don’t is because of our perception more than actual fact.  The AC Delco, for example, ………….  The Hayden 2797 ………..

My “Experiment”

My  “experiment” was conducted during an 8-week 7400 mile road trip we took last summer in our GMC motorhome.  We left on the trip at the height of the summer in Tucson – daily high temperatures near 110 degrees – and drove to the East coast at Maryland, went North to Maine and Quebec City, West to Michigan, South to Memphis, and then back to the Tucson area by the end of September.  Lots of different weather conditions.

Setting up the “experiment”

The first step of the experiment was to calibrate and install a mechanical engine temperature gauge.  I calibrated it on the stove with boiling water and it matched the exact temperature for the current atmospheric pressure and my altitude so I would know that engine temperature readings would be accurate.

The next step was to install a new aluminum radiator and AC Delco 15-4644 heavy duty fan clutch.

The next step was to install a bad – stuck open – thermostat in the engine so that I could tell how well the radiator was cooling and exactly how much cooling the engine needed at any given point.  Actually, the thermostat failed within a couple of days after beginning the trip and I left it as it was.  My thinking was that it would only affect the heater and would have no negative impact on the engine.  Some people think that the mileage would be measureably affected but I say, with lots of data since then, that mileage was not affected at all.

The final step was to validate that I could hear whether or not the fan was engaged – i.e. it was running at engine speed.  The AC Delco is a heavy duty clutch which apparently means that it has the guts to turn the fan at engine speed when it is at relatively high RPMs.  My hearing is good enough for that so the experiment is ready.

Gathering data

Data was gathered throughout the trip but, unfortunately not recorded in any scientific way.  I will have to rely on the web log I kept during the trip and my memory but it is not necessary to be too exact I think – read further and see what you think.

The first part of the trip was made during extremely hot days beginning on August first and second when we drove through Eastern Arizona, New Mexico, Texas and Oklahoma on the way to Kansas City.  The radiator and fan clutch combination had no problem keeping the engine cool but the fan clutch was engaged much of the time at highway speeds.  At that point in time the thermostat was working and the temperature gauge showed the engine cooling down to about 195 degrees while the fan was turning and when the fan stopped after another 30 seconds or so the engine temperature would climb to about 210 degrees.  At 90 degrees ambient temperature the fan was engaged about 70 percent of the time.  I measured that using a stop watch on my cell phone.  At 105 degrees ambient temperature the fan was on virtually 100 percent of the time.  The reason that I was concerned was that the noise was deafening and Carol was threatening to ask me to turn around and go home unless I could fix it.

During these two days I tried to improve the air flow through the radiator and the engine compartment by removing the passenger side wheel well liner (put it into the back of our Tracker tow car).  There was no measureable effect.  The fan was on as much as it had been before.  Side note: my coach had the exhaust vents above the wheel wells already.

When we got to Kansas City I swapped in a Hayden 2797 fan clutch that had been installed before the AC Delco.  This one worked and was much quieter than the AC Delco – it seemed that while it was engaged as much as the AC Delco was it didn’t run at full engine speed so it was quieter.  Another effect of using the Hayden fan clutch was that the engine temperature stabilized rather than oscillating from 195 to 210 degrees.  Just an observation that has nothing to do with solving the problem of why the fan needs to be on at highway speeds in the first place.

Somewhere along the line in the next few days the thermostat broke – stuck open – so now I would have more data on what was causing the fan clutch to engage.  The strange thing is that now I could see (hear) that the fan clutch was coming on when it would seem to be unneeded.  First thing in the morning the engine was cool and the ambient air was in the low 70’s.  The fan clutch would be engaged when the engine was first started as expected and then would turn off as soon as it (the clutch) warmed up.  The puzzling thing was that long before the engine was warmed up and while the ambient air temperature was still in the low 70’s the clutch would engage again.  This is when the engine temperature was less than 150 degrees – sometimes much less and we were driving at highway speeds.  Many times over the following weeks the engine temperature would be so low that I would worry about harm to the engine and the fan clutch would engage.

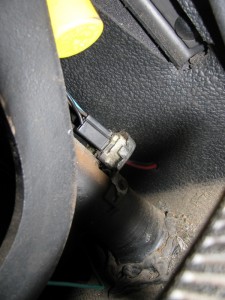
My initial thinking was that something was making that bimetallic spiral in front of the fan clutch hot and I tried to imagine ways of actually measuring the temperature there but could not.  I figured it must be that the air coming through the radiator was being heated somehow and it may possibly have something to do with the engine or transmission oil coolers.  I have spent many months thinking about this – seems obvious to me now – and just today realized that the only thing that could make the air hot enough to make the  fan clutch turn on at highway speeds is the exhaust system – the manifolds or headers.

My Solution

Unable to solve “the riddle of the phantom heat generator” I ignored the need for understanding the problem and worked on eliminating it.  During the winter I constructed some air dam structures from 18-wheeler mud flap material and hardware that prevent air from going around the sides of the radiator above the bumper and a spoiler that is installed at a 45 degree angle along the bottom-front width of the radiator.  The spoiler, from what I have been told, deflects air upward into the radiator that would otherwise go underneath it and it also causes a vacuum behind itself that helps to pull air through the radiator and probably out the bottom of the engine compartment.  Take a look at the photos below.

I didn’t know how air flow control could fix the problem but I modified it anyway.  The modification has apparently worked and I now have no fan noise at highway speeds except during the 30 seconds to a minute or so needed to cool down when getting back up to speed after traffic stops.  I am using a medium duty fan clutch (an Autozone Torqflo 922747) and so far – it got up to 94 degrees today – there has been no fan engagement at highway speed (that I can hear) and there is little or no fan noise in traffic.  This is the way it is supposed to be.

The summer is coming and I am thinking that I may reinstall the AC Delco fan clutch and try it with the new air flow scheme – back when that happens.

Update 7/19/2012 I never did go back and install the AC Delco heavy duty fan clutch – I sold it instead. The Autozone Torqflo has been in there for two years and thousands (6 or 7 minimum) of miles in very hot (110 degrees for hours while climbing) conditions and it is still doing fine so I saw no point in that experiment. I am still carrying a Hayden 2797 as a spare but have no intention of using it unless the medium duty fails.